Wednesday, December 14, 2011

Tidings of Joy

I received this card as a swap at my November business meeting. I do not remember who gave it to me.  I like how she made the stable.

Supplies:
Stamp Set- Tidings of Joy
Paper- Soft Suede, Whisper White
Ink- Stazon Black, Various reinkers

Monday, December 12, 2011

Christmas Lodge

I love this stamp set!  Every card I have have seen made using this stamp I have have thought was just beautiful.  This card I copied from my upline Kristi Stoughton.  We had a business luncheon in November and she showed us this card.  I think I will make this my Christmas card this year.
The picture does not do this card justice.  There are Mica Flakes on the tree that make it sparkle.

Supplies:
Stamp Set- Christmas Lodge, En Francais
Paper- Sahara Sand, Always Artichoke, Whisper White
Ink- Always Artichoke, Black Stazon, Sahara Sand
Accessories: Mica Flakes, Cherry Cobbler Quilted Satin Ribbon

Saturday, December 10, 2011

Christmas Stocking

My inspiration for this card is from a Splitcoast Stamper member with a posting name aklemo.  I changed the colors and a stamp set and created this card.  I have had 2 different groups make it and all have raved how pretty it is.
I unmounted the letters and was able to mount all 3 letters on an acrylic block to spell joy.  It was easy to organize spacing  and make the letters level prior to stamping.  Once I got them just right, I could stamp joy as many times as wanted and each time the letters were perfect.  I am loving the acrylic blocks!
Supplies:
Stamp Sets- Stitched Stockings, Lovely Letters
Paper- Marina Mist, Silver, Whisper White
Ink- Marina Mist, VersaMark
Accessories- Silver Embossing Powder, Perfect Polka Dots embossing folder, Rhinestone, 5/8" Organza Ribbon, Baker's Twine

Thursday, December 8, 2011

Christmas Card

I got this amazing card in a swap.  Unfortunately the creator did not leave contact information on the back.  The tree boughs are a tree stamp from Lovely as a Tree stamped upside down. How clever is that?  The ornaments are from Delightful Decorations and punched out using the Ornament Punch.  The greeting is from Heard from the Heart.  This card proves that a card can be lovely with only one layer.

Tuesday, December 6, 2011

Holiday Wreath

I attended a quarterly Stampin' Up! business meeting last month and one of the ladies brought a Christmas wreath made with rosettes.  It really was quite pretty.  I took a picture, went home, and stated to create my own.  I used DSP from Frostwood Lodge and bits and pieces from my retired paper stash. The new Simply Scored made it so easy to make the rosettes. I used buttons that I had and a piece of ribbon that came with a blanket I had purchased last year.  It matched perfectly!

Sunday, December 4, 2011

Advent Calendar

The minute I saw this in the Mini Holiday Catalog I knew I had to make it.  Once I cut out all of the windows and background squares, it went together rather quickly.  I painted an unfinished 12" X 12" wooden frame and tried to make my own Cherry Cobbler paint.  I used an entire bottle of reinker and was left with a bright pink color! I gave up and purchased a non-Stampin' Up! bottle of acrylic paint.  It matched very well.  I have to say it is pretty spectacular in person.

Supplies:
Stamp Sets- 25 & Counting
CS- Cherry Cobbler, Garden Green, Whisper White, early Espresso, Frostwood Lodge DSP
Ink- Cherry Cobbler, Garden Green, Early Espresso
Accessories- Peekaboo Frames Bigz L Die, Various punches, Rhinestones, Mini Jingle Bells, Stitched Felt

Sunday, November 27, 2011

Christmas Lodge

I made this card very simple.  I like using only two colors and using several mats.  I guess you would call that part of my stamping style! I was inspired by Jan Tinklenberg who is a Stampin' Up! demonstrator and does amazing work.

Supplies:
Stamps- Christmas Lodge, Teeny Tiny Wishes
CS- Cherry Cobbler
Ink- Cherry Cobbler
Accessories- Cherry Cobbler Quilted Satin Ribbon, Modern Label and Word Window Punches

Thursday, October 27, 2011

Mummy

I got this mummy card at  Convention 2010.  It was made by Jenny Fulton from Grand Rapids, MN.  I thought it was cute and very creative so I wanted to share it.

Tuesday, October 25, 2011

Greeting Card Kids II

I received this swap card last year at Convention.  It was made by Linda Madison.  She did a wonderful job coloring the little witchy.


The second card was done by Amy Fecteau who was my roommate at Convention 2010.  We participated in the same swap.  Her card base is embossed using the Vintage Wallpaper Embossing folder. She also added a decorative antique brad.

Sunday, October 23, 2011

SPOOKY!!!!!!

I have decided to decorate my fireplace, which is in my stamping studio, for the holidays.  I have not ever made a banner so I thought it was a great place to start.  I used what I had, some discontinued Halloween DSP and supplemented with coordinating colors.  I used punch art by Lorre Reibin, found on SplitcoastStampers, as embellishments and just had fun!


Wednesday, October 12, 2011

Baby Card

My daughter is hosting a baby shower and wanted a special card.  I wanted to do something unique and since it did not have to be mailed, it could have 3-D items.  I love the little clothespins and the picket fence.  I hope she likes it!

Supplies:
Stamp Sets- Baby Tees Jumbo Wheel, Curvy Verses
CS- Marina Mist, Whisper White, Wild Wasabi, Calypso Coral
Ink- Basic Black, Marina Mist
Accessories- Clothespins, Pearls, White Baker's Twine, Chipboard

Tuesday, September 27, 2011

Halloween

Sorry I have not posted in awhile.  I have not felt like stamping.  I was inspired to make this after seeing Mary Brown's project on her blog Stamper Camper's Corner.

I love Halloween and had so much fun making this!  I started with a frame I purchased from a major large box store.  Using the insert from the frame as my template, I cut out various pieces of DSP that I already had to use as background paper.  I used the Serif Essentials Alphabet and my Big Shot to cut out the letters from chipboard.  I covered each letter with Basic Black card stock, some of which I embossed using embossing folders.  I used various punches to decorate each letter and Voila! my latest Halloween project.

Wednesday, September 7, 2011

Always Thankful

School is going well and I like getting back into my routine.  It seems that summer was so long ago.  I come home tired and not too motivated to stamp, hence, not many postings!

As soon as I saw this stamp set in the new Holiday Mini Catalog (p. 19), I knew I had to have it.  I enjoyed coloring it in.  I have always had difficulty brayering the sky yet wanted the background to be sky like.  I used sponges!  It was so easy to do and I got the effect that I wanted.  I first sponged Tempting Turquoise then sponged Not Quite Navy part way down. I made sure my edges were a bit darker.

I also made a faux button.  I cut 5 buttons using the Buttons #5 Sizzlits Die.  I carefully glued them on top of each other lining up the button holes.  Next I used Crystal Effects over the top and let dry on a piece of wax paper.  When dry, I used linen thread.

Supplies-
Stamp Set:  Always Thankful
Paper: Not Quite Navy, Cajun Craze, Very Vanilla, Regal DSP
Ink: Stazon Black, Tempting Turquoise, Not Quite Navy, Old Olive
Accessories: Watercolor Pencils, Crystal Effects

Monday, August 29, 2011

Box 6

This is the last box.  Around the edge of the sun is Dazzling Details, Stampin' Ups! new glitter is a bottle.  It has a narrow tip which allows for precise application and no mess!  The sentiment is from the stamp set Pursuit of Happiness.

Saturday, August 27, 2011

Box 5

This a neat box.  The birds are hanging on Baker's Twine.  I also like the tree and how it uses texture.

Thursday, August 25, 2011

Box 4 and I am Officially back to school!

It is official- the school year for teachers has begun.  Please do not get me wrong.  I love my job, however, I had a wonderful summer and it is always an adjustment to get back in the school routine.  There is not as much time to stamp and read now (another of my passions!).
Box 4 uses the chipboard cloud from the previous box covered with Whisper White card stock cut using the Dotted Scallop Ribbon Border cut in half.  Again, the 2011- 2012 In Colors were used.


Tuesday, August 23, 2011

Box 3

This is my favorite box.  The fence is made out of real wood and white washed.  I love the clouds.  I used the negative from the On Board Merry Medley clouds as a template and sponged White Craft Ink and Frost White Shimmer Paint.  The flowers are on floral wire so they pop out.

Sunday, August 21, 2011

Box 2

Here is box number 2.  Again it uses the border stamp from Borderlines and the In Colors.  The banner hangs on Baker's Twine with little bows in each corner!

Friday, August 19, 2011

Box 1

This is an enlargement of box 1.  I particularly like the border at the bottom.  It is from the stamp set Borderlines.  A vellum layer is on top of the 2nd butterfly.  Baker's Twine is the body of the butterfly and the antennae.

Wednesday, August 17, 2011

Every Last Detail

Stampin" Up! offered 3 additional classes during Convention on Friday night.  This was something new.  Tracy and I chose the class "Every Last Detail".  We got the supplies to make each of the 6 scenes in this tray.  It was very time consuming and each box took at least 1 hour to complete.  Needless to say I finished mine at home. It was fun to use new products and create something different.  It featured the 5 new In Colors.  Box 3 is my favorite.

Monday, August 15, 2011

Stampin' Card Keeper

Here is another project I made at Convention.  This box will be in the new Holiday Mini Catalog to be released September 1st.  Although it is more elaborate than I tend to be, it is a sturdy card holder with pizazz!  The top is covered with fabric and it comes with a pattern to make covering it a breeze.  Inside are five dividers which are also decorated.  It certainly beats the shoeboxes I have used to store my card samples!

Wednesday, August 10, 2011

Storage

I bought this card catalog at an auction many years ago.  It holds an amazing amount of supplies.  It is a little beat up but I think it is charming.  Above are cubes that hold my 12" by 12" card stock.

Monday, August 8, 2011

Ribbon Holder

How do you like my new ribbon holders?  They are made using vinyl rain gutters!  They were cheap to make and the length can be customized.  I now have my ribbon arranged by color.  It is so much easier to get what I need. 
This idea is not original, however, I apologize to the creative person who thought of this.  I found the idea on SplitcoastStampers.

Saturday, August 6, 2011

Raining Flowers

This is a close-up of one of the make and takes.  I love the "it's your day"  down the right side.  I used the Stamp-a-ma-jig to make them line up.

Supplies:
Stamps- Raining Flowers, It's Your Day
CS- Old Olive, Whisper White
Ink- Old Olive, Island Indigo, Cherry Cobbler, More Mustard
Accessories- II Ruffled Ribbon, Old Olive 1/8" Taffeta Ribbon, Pearls, stampler

Thursday, August 4, 2011

More Stamping Room Pictures

I already had the desk and L shaped space.  The "L" is easier now to keep clear with the additional new workspace.  Above are plastic drawers with all of my 8-1/2' by 11" card stock.  I like to have all the colors on hand so I am not limited.  My laptop sits on my desk and along with my all purpose printer.  My super duper professional printer is next to to the "L".  It is so big that I could not use it.  Now it is in a great location.

Tuesday, August 2, 2011

Convention Projects

This was one of my make and take projects at Convention.  I needed to finish it at home since I never seem to finish when at Convention.  I love the Old Olive and Cheery Cobbler flowered card.  Details to follow.

Thursday, July 21, 2011

Artistic Etchings

I never really liked this stamp set.  Then I saw this amazing cards.  I love the background.  From what I can tell, the butterflies were stamped first, colored in, then masked. En Francais was stamped next then blue ink was lightly sponged to give a sky effect. What a beautiful card.  I wish I could give credit to the artist who created it.

Inspired by Nature

Here is another card from Convention.  It was on the display boards.  I liked the color combination and the little punched out flowers.

Wednesday, July 20, 2011

Baby Bundle

I thought this was a lovely card.  It was on the display boards at Convention.  There are no names or directions posted.  I do know that is from the stamp set Baby Bundle.
At Convention, Stampin' Up! has a lot of display boards set up arranged with cards and other projects demonstrators have submitted through out the year.  They are arranged by color and there are thousands of cards displayed for inspiration.  Everyone takes lots of pictures to take home the fabulous ideas.  This year, my bee hive card was up there.  I was so proud!  This is the second year in a row i have had a card on display at Convention.

Tuesday, July 19, 2011

Shelli Gardener

This is me with Shelli Gardener the co-founder and CEO of Stampin' Up!  I waited in line during lunch to have my picture taken with her and a brief chat.  Tracy, my roommate, decided to have lunch instead.  It was such a short line.  Who would have imagined I would wait for over an hour?  You probably are asking yourself if I have rocks in my head?  Let me explain. Shelli is such a down to earth person.  What you see is what she is.  She is one of the most gracious women I have ever met.  She does not hurry you at all when you are with her.  She places family first.  Her values are right on.  Yes, it was worth the wait!

Saturday, July 16, 2011

Summer Solstice

I did not have a chance to use this as a swap.  I just got too busy!  This card features the new In-Color Wisteria Wonder.  The flowers were stamped in Cherry Cobbler.  Gotta love the Color Coach because I never would have used these colors together!

Supplies:
Summer Solstice
CS- Pink Pirouette, Wisteria Wonder, Whisper White
Ink- Cherry Cobbler, Wisteria Wonder
Accessories- Wisteria Wonder ribbon, Pearls, Framed Tulips embossing folder

Friday, July 15, 2011

Convention

I am in Salt Lake City at Stampin' Up!'s annual Convention.  This is my 8th Convention and  I have lots of great and special swaps to share with you when I get back Sunday night.  It is a wonderful experience and one that I look forward to each year.  I will share more with you later.  Until Sunday night!

Thursday, July 14, 2011

Field Flowers

Although it may be difficult to see, I embossed the top half of the black paper using Perfect Polka Dots then embossed the bottom using Vintage Wallpaper.  Where the two meet  added a pearl on each side.  I am using this card as one of my swaps!

Supplies:
Field Flowers
CS- Pool Party, Black, Whisper White
Ink- Pool Party, Lucky Limeade
Accessories- Embossing Folders: Perfect Polka Dot and Vintage Wallpaper

Tuesday, July 12, 2011

Designer Series Paper (DSP)

Jill Olsen demonstrated how to make this kind of card on her blog.  It does not open like a regular card.  The Designer Series Paper is attached to a flap that lifts up and reveals a place for the message.

Supplies:
Stamp sets- Sincere Salutations, Posy Punch
CS- Pacific Point, Wild Wasabi, Whisper White, Beyond the Garden DSP
Ink- Pacific Point, Wild Wasabi
Accessories- Perfect Polka Dots embossing folder, Fancy Flower Punch

Saturday, July 9, 2011

Snow Much Fun 2

Here is another card made from the Stamp Set Snow Much Fun.  I cased the snowman from the new Idea Book and Catalog.  I loved the antiqued look of it then changed it to suit this layout.  The layout is from this week's Splitcoast Stampers' Card Sketch.  I find I can create more easily if I have a layout as a guideline.


Supplies:
Stamp Set- Snow Much Fun
Ink- Soft Suede
CS- Not Quite Navy, Crumb Cake, Poppy Parade DSP, Confetti Cream
Accessories- Poppy Parade re-inker: Not Quite Navy, More Mustard watercolor crayons; Watercolor Pencils, Blender Pen

Thursday, July 7, 2011

Snow Much Fun 1

I have finally put most of my things away and now have a large space to stamp on.  I absolutely love my new space!!!  I have been making my swaps for Convention and this one is from the set Snow Much Fun ( I made 20 of these).  Stampin' Up! retired my favorite snowmen stamps so I was thrilled to see this one in the new catalog.  As a demonstrator I was able to pre-order it and could not wait to play.

Supplies:
Stamps- Snow Much Fun, Teeny Tiny Wishes
Ink-Black Stazon
CS- Not Quite Navy, Baja Breeze, Whisper White
Accessories- Watercolor Pencils, Blender Pen, Northern Flurry Embossing Folder, Punches

Saturday, July 2, 2011

One of Fifty

I disliked the original picture so decided that I would change it out once my computer was repaired.  After I did that, I lost all of the previous posting!!!  Oh well......  I made this shadow box as my swap for the Dinner and Holiday Swap that is this Tuesday, July 12th at 7:00.  This is the first unofficial event of Stampin' Up!'s Convention in Salt Lake City for me.  We had to choose a holiday other than Christmas and make a card or 3-D project.  Most people will chose non-traditional holidays such as Dictionary Day (in October I believe) or Penguin Awareness Day (January 20th).  Since Halloween is my favorite non-religious holiday (I consider it a day of harmless fun), I chose it for my swap.


Tuesday, June 21, 2011

No, I am not missing!

Between my workspace still not together and finishing up the school year, I have not done much stamping nor blogging.  School gets out this Friday.  One of the first things I want to do is post to my blog.  See you this weekend!

Sunday, June 5, 2011

Strength & Hope

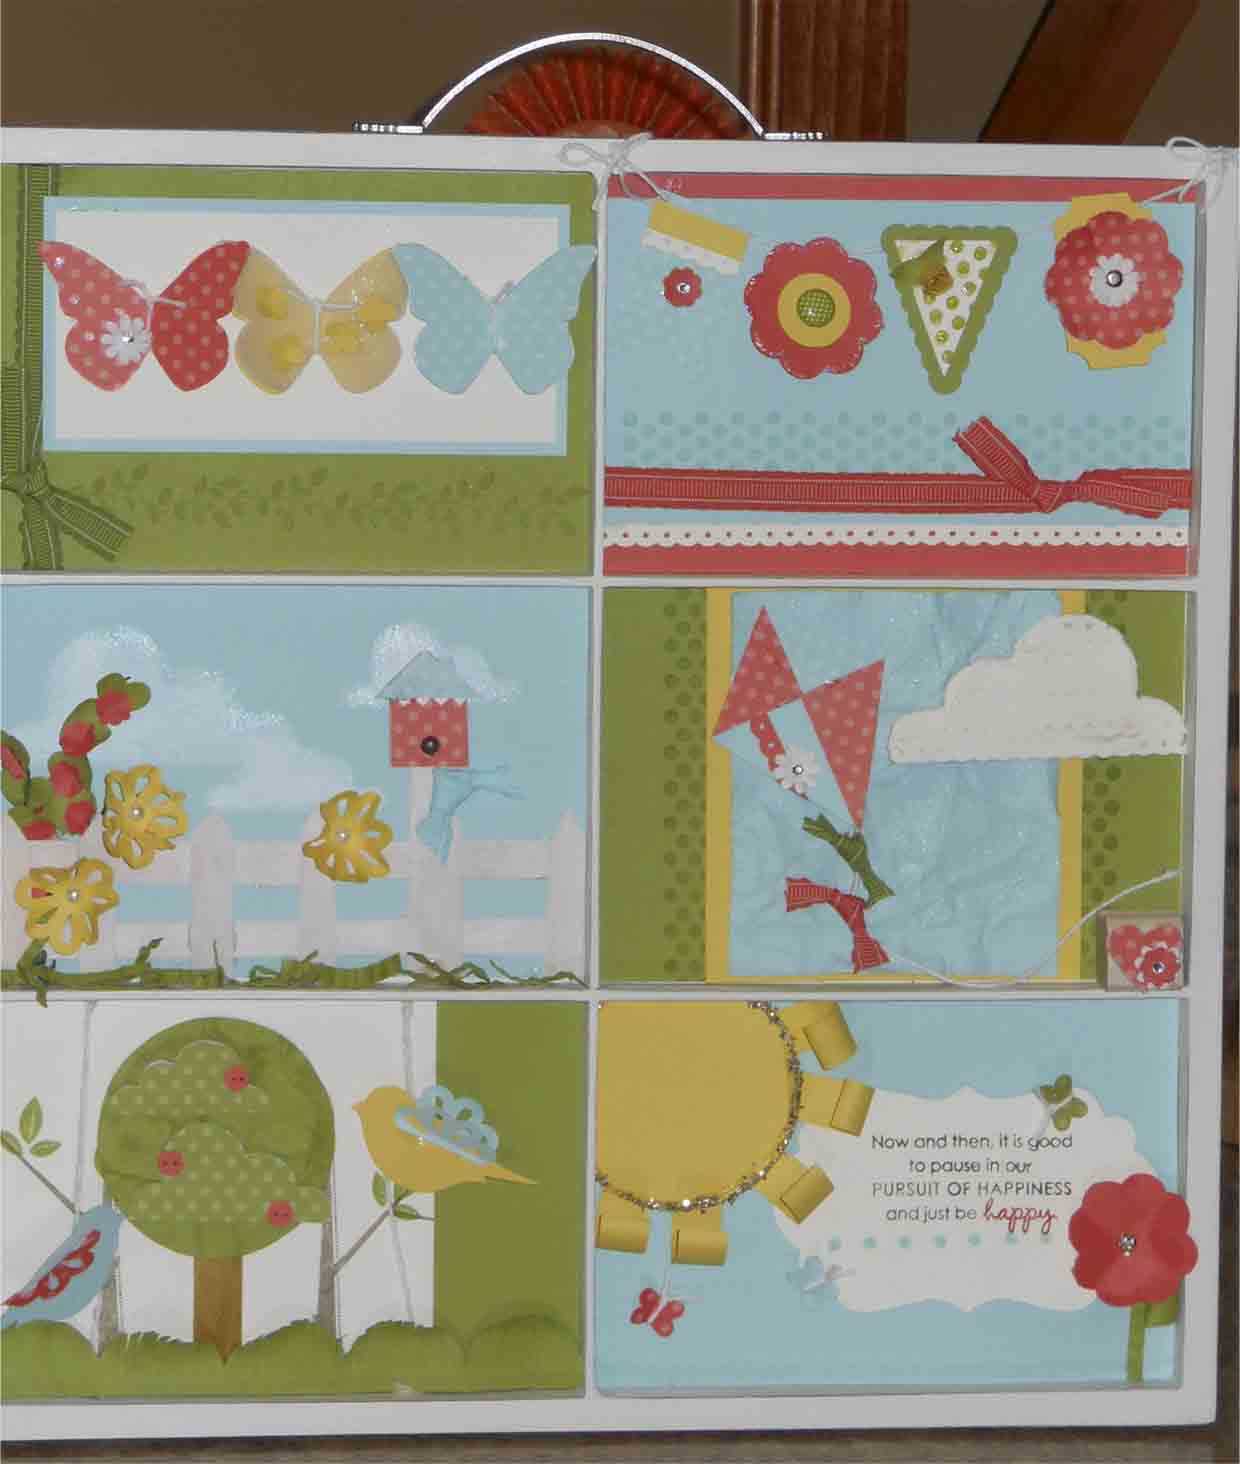
This is my first creation in my new stamping room!  I am still unpacking but I love my new room.  I have a lovely seating area, work space, and separate stamping space.  Hopefully I will put everything away by next weekend.

When making this card, I tried a couple of different color combinations.  The lighter colors just did not have the pop that I thought this card should have.  I used my brayer and added Crumb Cake ink to the flat inside of the Flower Garden embossing folder.  Next I took Very Vanilla card stock and ran it through my Big Shot.  I trimmed it and mounted it on Crumb Cake.  I used a piece of Poppy Parade DSP and mounted it on a card base of Crumb Cake.  I stamped the butterflies in Poppy Parade, cut them out, and added pearls.
I made a little banner with happy birthday stamped on it, cut the ends in a "V", then added a pearl.  I attached the butterflies with Dimensionals.  The wonderful thing about this stamp set is Stampin' Up! is donating $2 for every set sold to Breast Cancer Research!

Supplies-
Stamp Set:  Strength & Hope
Ink: Crumb Cake, Poppy Parade
Paper:  Crumb Cake, Very Vanilla, DSP from the In Color Assortment
Accessories:  Flower Garden embossing folder, Pearls, Dimensionals

Sunday, May 29, 2011

My Stamping Room

After much thought and discussion, I am switching rooms with my husband.  I have out grown my beautiful but little stamping room.  We have hired movers to help us switch out the rooms.  I am now packing everything in anticipation.  I hope to be stamping again by midweek.  When my room is done, I will post pictures.  Hope to post soon!

Sunday, May 22, 2011

On Your Birthday

I thought this was a fun card.  It uses the Elegant Lines embossing folder and flowers from the Big Shot die Blossom Party.  The stamp set is On Your Birthday

Saturday, May 21, 2011

Love & Care

Love & Care is a level 2 Hostess set in the Summer Mini Catalog.  This was a fast and easy card.

Friday, May 20, 2011

Strength & Hope

My downline, Tracy, designed this card.  She used the Strength & Hope stamp set.  Stampin' Up! is donating $2 to The Breast Cancer Research Foundation.  This was one of my favorite cards from the swap.

Thursday, May 19, 2011

Wednesday, May 18, 2011

Pinwheel Swap

This lovely card was designed by Christyann Rothmel.  Start with 2 squares 2 3/4" by 2 3/4".  Place one square with the corners at 12 and six o'clock.  The other is attached on top with the top and bottom edges horizontal.  Alternate DSP 1 1/4" squares and attach on the base.

Tuesday, May 17, 2011

Shoebox Swap

This card utilizes the DSP Beyond the Garden found in the Summer Mini Catalog.  The background was embossed first using Perfect Polka Dots embossing folder.  The 2 flowers in the front have a pearl in the center.  I am sorry I do not know who designed this beautiful card, I did enjoy making it.