Tuesday, December 11, 2012

Sneak Preview

The UPS man, in a Budget truck rental, delivered 13lbs. of goodies to me from the new mini catalog that becomes available on January 3rd!  It was just like Christmas opening the box and seeing brand new toys to play with. 

I was asked today to make a special card for a colleague at work who is undergoing surgery tomorrow.  This technique and image was CASED from the catalog.  First, I stamped the Swallowtail image using VersaMark ink.  Then, I embossed using Pool Party embossing powder.  Next, I brushed Champagne Mist Shimmer Paint over the stamped image using an Aqua Painter.  I heat set it again and voila!- a very shimmery translucent image.


Supplies:
Stamp Sets- Swallowtail, Warmest Regards (retired)
Paper- Whisper White, Pool Party, So Saffron
Ink- VersaMark
Accessories- Champagne Mist Shimmer Paint, Pool Party embossing powder

Sunday, November 25, 2012

Joyous Celebration

This was CASED directly from the Holiday mini catalog.  I changed the colors a bit using Cherry Cobbler as the card base and Old Olive for the ribbon.  This is such a beautiful embossing folder, however, after making it several times I realized there is a top and a bottom.  Look very carefully and you will see a bell at the bottom which is not on the top!

Supplies:
Stamp Set- Joyous Celebrations
Paper- Cherry Cobbler, Whisper White
Ink- Cherry Cobbler'
Accessories- Extra-Large Oval Punch, Textured Impressions Holiday Frame Embossing Folder, Bitty Banners Framelits, Rhinestones, 1/2" Old Olive Scallop Dots Ribbon

Sunday, November 18, 2012

Ornament Keepsakes

Here is the last CASED card of the week.  I fell in love with its simplicity and elegance.  It is by Angie Leach and I found it on Splitcoast Stampers.  Here is the link to her blog- http://toocoolstamping.typepad.com/t...***-cards.html
I am using it for my monthly classes.  I like how a Whisper White piece of card stock- 8" by 4" is folded in half then it is mounted on a 4-1/4" by 5-1/2" piece of Early Espresso.  It reduces the number of layers.

Supplies:
Stamp Sets- Ornament Keepsakes, More Merry Messages
Paper- Early Espresso, Whisper White, Brushed Gold
Ink- Crumb Cake, Early Espresso
Accessories- Pearls, Baker's Twine, Delicate Designs Embossing Folder

Friday, November 16, 2012

Daydream Medallions

Here is another CASED card.  I spotted it on my upline's blog and she gave credit to a design on Pinterest by Margaret Radburn.  I attempted to find it on Pinterest but could not find it. 
I am using this as one of the cards for my Stamp-a-Stack this Saturday.  It is a simple card yet quite cute.

Supplies:
Stamp Set- Daydream Medallions, More Merry Messages
Paper- Whisper White, Real Red, Garden Green
Ink- Real Red, Garden Green
Accessories- Retired ribbon, Bird Builder Punch

Wednesday, November 14, 2012

Christmas Lodge

This card was CASED from Splitcoast Stampers.  The creator's user name is Rostergold and can be found http://www.splitcoaststampers.com/gallery/photo/2227722?&cat=21832.  I simplified it and used a piece of DSP from Festival of Prints Paper Stack from the Holiday mini catalog.  I cut out the stamped image and the matt using the Labels Collection Framelits.  The card base is Soft Suede.  I think this card proves that a Christmas card can be attractive in colors other than traditional red and green.

Supplies:
Stamp Set- Christmas Lodge
Paper- Soft Suede, Very Vanilla
Ink- Soft Suede
Accessories- Cherry Cobbler Seam Binding Ribbon, Labels Collection Framelits

Monday, November 12, 2012

Rejoicing with You

I made this card for a Convention swap.  Since the angel is somewhat distressed, it reminded me of denim.  It made my color choices very easy.  I chose my favorite color Midnight Muse to stamp the image and Bashful Blue the sentiment on a pre-cut  Big Shot Top Note.  I sponged the edges with Midnight Muse.  I matted it on Midnight Muse that was embossed using the Fancy Fan Folder.  The card base was Whisper White.

This card is one of 5 that we are making as part of  a Stamp-a-Stack this Saturday, November 17th.


Supplies:
Stamp Set- Rejoicing with You
Paper- Whisper White, Midnight Muse
Ink- Midnight Muse, Bashful Blue
Accessories- Big Shot Top Note, Fancy Fan Folder

Monday, November 5, 2012

Snow Much Fun II

Here is another snowman from Snow Much Fun.  I made this last year for Convention, put it away, and forgot about it.  I am so glad I found it. 

I stamped using a brown ink on Confetti Cream (retired) then used Watercolor pencils and a Blender Pen to color it in.  I had to be careful not to let it bleed as I colored it in.  Next I mounted it on Not Quite Navy.  I used a piece of DSP in Real Red to give it a little pop.  I stamped the bird, cut it out, and attached it using a Dimensional.

Since Confetti Cream has retired, in the future I will use Natural Ivory in its place.

Supplies:
Stamp- Snow Much Fun
Ink- Brown
Paper- Not Quite Navy, Confetti Cream, Crumb Cake, Real Red DSP
Accessories- Watercolor Pencils, Blender Pen


Friday, November 2, 2012

Snow Much Fun I

I was very sad when Frosty Friends retired.  I loved that stamp set.  The snowmen were so cute and I used it a lot.  Snow Much Fun is a fun replacement.

For this card, I used Baja Breeze and embossed it using the Northern Flurry Embossing Folder.  I mounted it on Not Quite Navy.  I stamped the snowman on Whisper White and colored it in using watercolor pencils and a blender pen.

Supplies:
Stamp set- Snow Much Fun, Teeny Tiny Wishes
Paper- Not Quite Navy, Baja Breeze, Whisper White
Accessories- Watercolor pencils, blender pen, Modern Label and Word Window punches, Northern Flurry Embossing Folder

Wednesday, October 31, 2012

Snowflake Soiree II

Here is try number two using the Snowflake Soiree stamp set.  I used Midnight Muse and Bashful Blue inks on Whisper White.  After I wrapped a piece of Midnight Muse ribbon around it, I mounted it on Midnight Muse. I added rhinestones to the centers of the big snowflakes.  For the greeting, I stamped in Real Red, cut the ends, then rubbed it using my bone folder to break done the fibers to make it curve more easily.

Supplies:
Stamp set- Snowflake Soiree
Paper- Midnight Muse, Whisper White
Inks- Midnight Muse, Bashful Blue, Real Red
Accessories- Midnight Muse ribbon, Rhinestones

Monday, October 29, 2012

Snowflake Soiree I

I decided to purchase Stampin' Up!'s newest snowflake stamp set so I could be current.  I am glad I did!!!!  I like that each snowflake is unique, a bit different, and varies in size.

I used the Triple Time Stamping Technique that I learned about from the blog Stamp With Brian.  I am loving this technique because it is so versatile.  I am sure you will see it again and again throughout the different seasons.

For this card I used Baja Breeze and Not Quite Navy.  Although you might not be able to tell, I added Silver Foil Smooch Spritz to make it sparkle.

On a side note, I used my new Stampin' Up! paper trimmer.  It works great.  I am so glad I got it.

Supplies:
Stamp Set- Snowflake Soiree
Paper- Baja Breeze, Whisper White
Ink- Baja Breeze, Not Quite Navy
Accessories- Silver Foil Smooch Spritz

Saturday, October 27, 2012

Perfectly Preserved III

For card number 3, I used just two colors- Whisper White and Cherry Cobbler.  I stamped the apple three times and attached it to a piece of Cherry Cobbler using Dimensionals.  I mounted this on Whisper White which I mounted on the card base of Cherry Cobbler.  I stamped "just for you" and cut it out using the new Bitty Banners Framelits.  This was another fast and easy card.

Supplies: Perfectly Preserved
Paper- Whisper White, Cherry Cobler
Ink- Cherry Cobbler
Accessories- Bitty Banners Framelits

Thursday, October 25, 2012

Perfectly Perserved II

I am very guilty of using a stamp set just a couple of times.  Today I decided to make several different cards using the same stamp set.  Here is card number 2.  I used more of the Orchard Harvest DSP (instead of hoarding it!) and chose the More Mustard checkered pattern.  I matted it on More Mustard.  Next I stamped the preserve's jar using Early Espresso on Very Vanilla.  I added Lucky Limeade stems then More Mustard, Raspberry Ripple, and Island Indigo flowers. For the edging, I used Island Indigo and the Finishing Touches Edgelit.  This was a very fast and simple card to make!

Supplies:
Stamp- Perfectly Preserved
Paper- Orchard Harvest DSP, More Mustard, Very Vanilla
Ink- Early Espresso, Lucky Limeade, More Mustard, Raspberry Ripple, Island Indigo
Accessories- Finishing Touches Edgelit

Tuesday, October 23, 2012

Perfectly Perserved I


I bought this stamp set during the pre-order period Stampin' Up! demonstrator's get.  That was in August.  I finally put it together last week and used it for a workshop.  Feeling very uninspired, I turned to Stampin' Success our exclusive magazine for demos.  I CASE'd it directly. I like the bright colors and the use of the edging.

Supplies:
Stamp Set- Perfectly Perserved
Paper- Orchard Harvest DSP, Island Indigo, More Mustard,      Vellum
Ink- Raspberry Ripple, More Mustard, Island Indigo, Lucky Limeade
Accessories- Linen Thread, Lucky Limeade ribbon, Edgelet-Adorning Accents


Sunday, October 21, 2012

Wondefall Thank You Tag

I was asked to design and create a tag card for one of my new customers who had just had a house warming party.  She wanted a fall theme using the rich autumn colors of New Hampshire.  I made a pocket for the tag and topped the tag with a piece of Designer Series paper.  I would have liked to have added a button but these were going to be mailed.  I used the Woodgrain Textured Impressions Embossing folder on top of the base of the pocket and the Square Lattice folder for the leaves.  Using the Autumn Accents Bigz Die, I got out 6 leaves at a time then embossed several in one sweep.  It was fast and easy to do!  She was very pleased with the results.

Supplies:
Stamp Set- Wonderfall
Papers- Crumb Cake (but for the real ones I substituted Naturals Ivory), Chocolate Chip, Cajun Craze, Cherry Cobbler, Old Olive
Accessories- Woodgrain and Square Lattice Textured Impressions Embossing folders, retired Chocolate Chip ribbon

Saturday, October 20, 2012

Whoops!!!

Whoops!!! I forgot to post.  I thought I had more scheduled than I did.  It has been a busy week.

Here it is completed.  I am not always pleased with projects when they are finished.  However, I am very pleased with this.  It was packed and shipped to my daughter last weekend and she got it on Monday.  I was shocked due to the fact it took 10 days for her birthday card to reach her mailbox.  I went back and changed out some of the boxes in the one I made last year and am now happier with my own.  I guess every year it would be fairly simple to take one scene out and change it around to freshen it up.

Some of my customers are not big Halloween fans, imagine that!  They have asked me to create a Christmas one.  I think that will be fun to make and I hope to start on it tomorrow.

Saturday, October 13, 2012

"L,L"

These were my last letters and I thought I had lost my mojo.  It was plain and uninspiring.  I added the little mummy from Googly Ghouls, wrapped it in Baker's Twine and added a googly eye.  Still not right.  Next I made Frankenstein and popped him on using Dimensionals.  Better.  Last I added the bat from the same set.  Much better!

Thursday, October 11, 2012

"A"

The last letters have been the most fun.  For embellishments to "A" I needed to make a cat.  My daughter loves cats and is not quite yet a "cat lady".  She is stopping at three.  They are well cared for and rule her house.  Her latest addition is Sushi, a large black and white long haired cat.  I thought of Sushi as I made this feline.  I used the 1-3/4" circle punch for the body. Next I cut a second circle then punched again to get the arc for the tail.  The ears and feet are from the retired 5 petal punch.  The pumpkin was made from three 1" circles.

Tuesday, October 9, 2012

"N"

"N" was also simple.  I used the oval punch to cut out 3 ovals to form the pumpkin.  Before putting them together, I sponged the edges with Pumpkin Pie.  The ghosty was made from the owl punch.  I cut out a Pumpkin Pie owl then one in Whisper White.  I turned it upside down, cut off the feet, added eyes, and a mouth, then voila!- a little owl all set to go trick or treating.

Sunday, October 7, 2012

"W"

I like the simplicity of "W".   I used the owl punch to make this darling little owl.  For the wings, I used the scallop punch, cut it in half, then folded each to make it seem like he was flapping his wings.  The googlie eyes make him playful!

Friday, October 5, 2012

"bOO"

"bOO" was fun to make!  I used a textured embossing folder to emboss the "b" and the "O".  I used the Designer Rosette Bigz XL to make the second "O".  They are so easy and quick to make.  I used the retired bat punch for the two bats.

Wednesday, October 3, 2012

"EE"

For the letters "EE" I used Old Olive polka dotted DSP.  I embossed it using the Spider Web Textured Impressions Embossing Folder.  Next I rubbed the new Illuminate Glimmer Watermark Stampin' Pad.  I used Sticky Strip directly on the DSP for the spinneret then added glitter.  I might add a pompom for the spider's nose.

Monday, October 1, 2012

Halloween

I love Halloween.  I adore Halloween.  OK, you get the picture.  I am making a Halloween decoration for my daughter.  It will be framed and spell out "Halloween".  This is the first letter.  Of course it is all Stampin' Up! materials and a mixture of old and new.  I will post each letter then a picture of it all done. The bat features the owl punch.  Note the letter H is textured and raised.

Thursday, September 27, 2012

Frightening Feline

I received this adorable swap at Convention.  It was made by Lorree Bosworth of Ridgecrest, CA.  I believe the spider DSP has retired as I cannot find it in the current Catalog.  The black card stock at the bottom was embossed using the new Fancy Fan Folder.  How cute! 

Tuesday, September 25, 2012

Bootiful Occasions

This cute card I received as a swap from Sally Nusbaum at Convention.  She used Basic Grey card stock in the Spider Web embossing folder.  Next she put some White Shimmer paint in a mister filled with rubbing alcohol and sprayed liberally.    She colored in the boot, mounted it on Rich Razzleberry, and attached Striped Satin ribbon under a Pumpkin Pie circle with a brad.  I was not impressed with this stamp set until I saw Sally's card.  What a fun card!

Supplies:
Paper- Basic White, Basic Black, Basic Grey, Rich Razzleberry, Pumpkin Pie
Ink- Black Stazon, Pumpkin Pie, Rich Razzleberry, Old Olive
Accessories- Blender Pen, Spider Web embossing folder, White Shimmer Paint, Striped Satin Ribbon, Mini Brads

Sunday, September 23, 2012

Halloween

I found this card in my stash of holiday cards.  I know I CASED it from somewhere several years ago but sadly cannot give the person who created this credit.  This is a quick and easy card to make with very little stamping.

Friday, September 21, 2012

Home is Where the Haunts Is

Here is the first shadow box I made several years ago.  The dimensions are a standard card 4-1/4" by 5-1/2" and scored on both sides at 1/2" and 1".  I used a paintbrush and made a wash of several colors starting at the top of a 3-1/2" by 4-1/4" piece of watercolor paper.  Next I stamped the background using the wheel- Spooky Skyline.  I punched out a moon then added the witch using a Dimensional.  I stamped the house close to the 1" score line then carefully cut out an oval.  I stopped cutting the oval once I was close to the house and proceeded to cut around the house by hand.  I used SNAIL adhesive on the ends then used 3 black brads on each side as a decorative embellishment.

Wednesday, September 19, 2012

House of Haunts

Here is a card I made using the classic Halloween set- House of Haunts.  I made a shadow box then embossed the haunted house using black embossing powder on watercolor paper.  Next I made a mask for the moon and brayered shades of orange for the background.  I colored the moon in and attached it in the middle to the Pumpkin Pie cs.

Dimensions-  Two pieces of Pumpkin Pie card stock 5-1/2 " by 4-1/4".  I scored both at 1/2" and 1" on both ends.  On one piece I stamped "happy halloween" in the center towards the bottom then cut out a circle between the 2 scored lines being careful not to cut through "happy halloween".  Attach the 2 pieces of card stock between the end and the first scored line.  The watercolor paper is 3-1/2" by 4-1/4".

Monday, September 17, 2012

House of Haunts

I love Halloween.  I adore Halloween.  I love to decorate for Halloween.  My classroom has been described as the "room from Halloween h..."!  The kids love it, which is why I do it.  It is a shame my own kids are grown up and away for Halloween.

I wanted to make an easel card that I could use one of those little battery operated lights inside.  I stamped on vellum using the retired stamp set House of Haunts- you can bet I will never get rid of this set!  I cut my Basic Black card stock 8-1/2" by 4-1/4" and scored 4-1/4" down.  I cut a second piece 5-1/2" by 4-1/4" and scored 1/2" down from the top.  I cut out a rectangle from the smaller piece and inserted the vellum.  I used the 2Way Glue Pen on the inside to attach the vellum.  I cut out a piece of Howlstooth & Scaringbone DSP  4 " by 4-1/2" then cut out the center to frame the stamped image.  Next, using the Scallop Square die, I cut out the orange frame manipulating it to the size I wanted.  I again cut out the center and attached it on top of the DSP.  I used my new from the Providence Regional- Seasonal Sayings to stamp Happy Halloween, then layered it and attached to the bottom of the larger piece of black paper.

Saturday, September 15, 2012

Autumn Accents

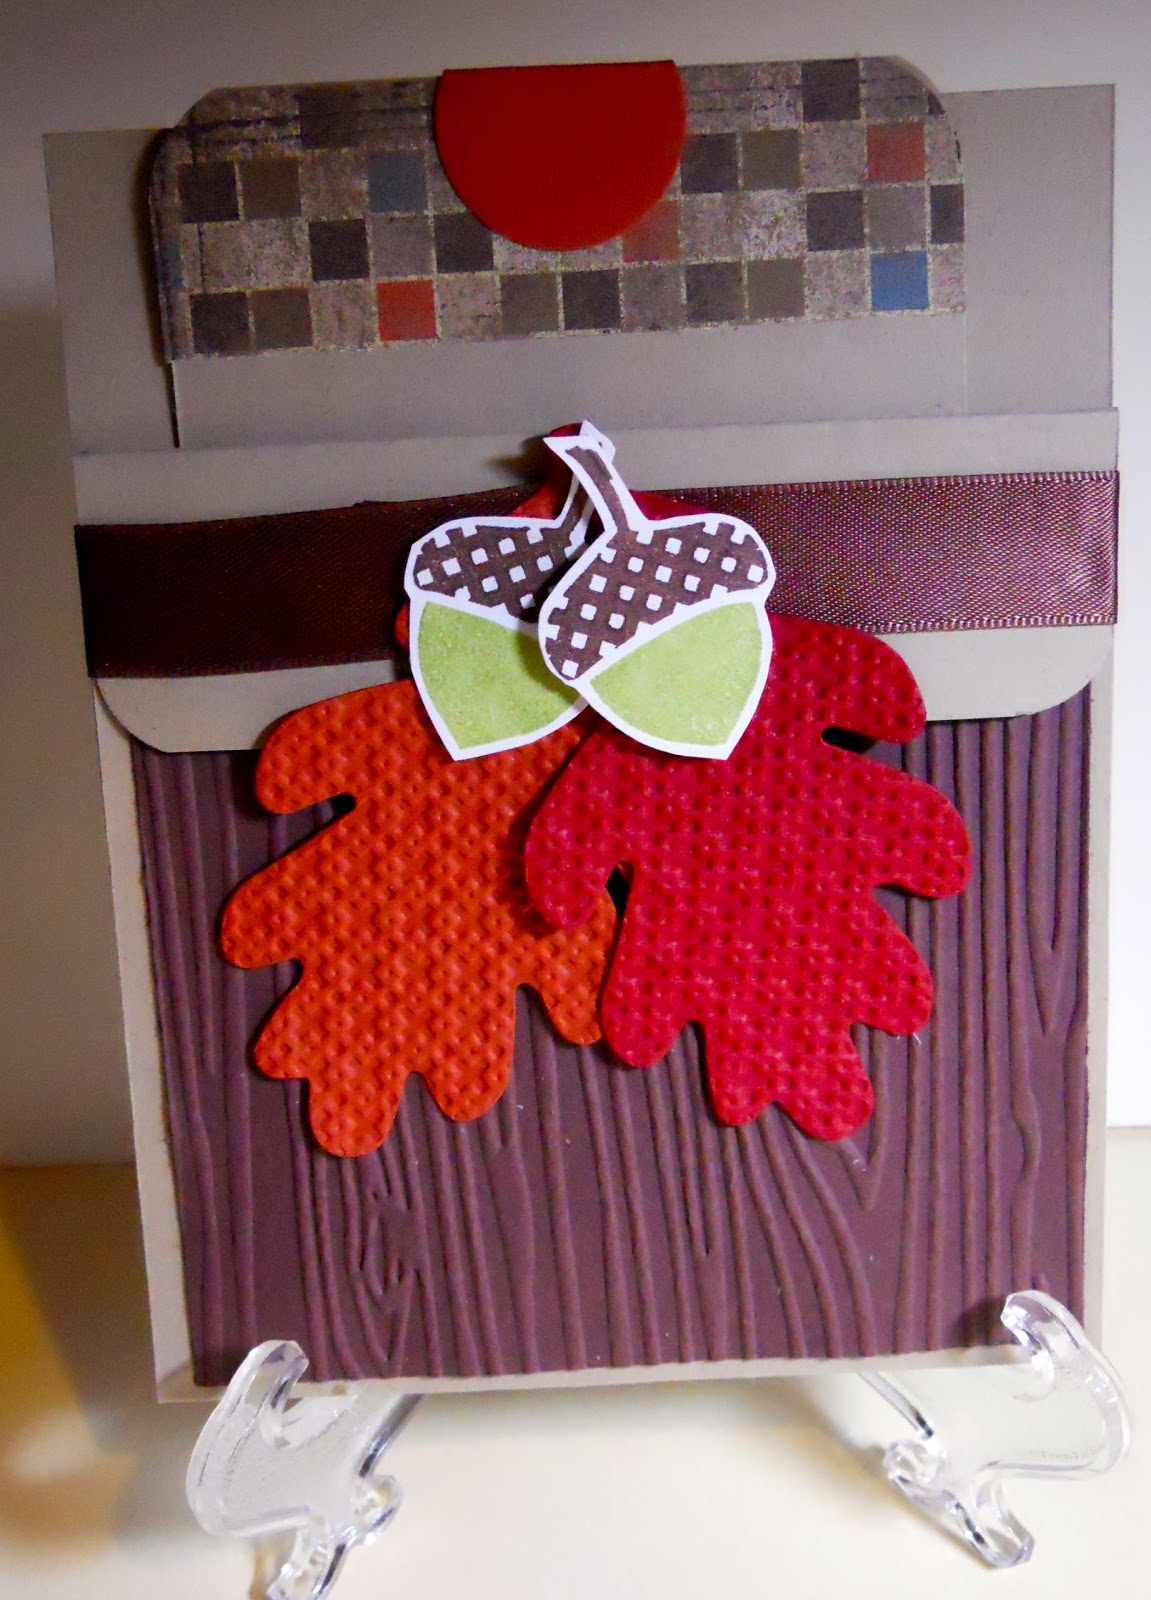
Fall is my favorite time of year.  I love the cooler days, the crisp air, and the amazing colors when the trees begin to turn.  This was a technique that was demonstrated at the Stampin' Up! Regional in Providence.  Unfortunately I did not write down the name of the presenter.  For that I apologize.  Using the Natural Composition Specialty DSP, which is already embossed, I cut out leaves using the Autumn Accents Bigz Die.  Remember that you can cut out up to eight pieces of card stock at a time.  Next I started with my lightest color and buffed it into the paper using a sponge.  I added several colors ending with the darkest color on the outside edges.  Next I used the new Woodgrain Textured Impressions Embossing Folder on a piece of Crumb Cake.  Then I lightly sponged Soft Suede over the raised portions.  I put more on the knot holes.  Last, I layered the pieces together.  I can't stop using the retired stamp set Sincere Salutations.  It was a gift from Shelli, the co-founder of Stampin" Up! to all the demonstrators one year.  It is a very versatile set and I have not found anything yet that I like as well to replace it.

Supplies:
Stamp Set- Sincere Saluatations
Paper- More Mustard, Cherry Cobbler, Crumb Cake, Natural Composition Specialty DSP
Ink-  More Mustard, Cherry Cobbler, Garden Green, Pumpkin Pie, Daffodil Delight
Accessories- Decorative Label, Extra-Large Oval, Cherry Cobbler ribbon

Thursday, September 13, 2012

French Foliage

I have recently discovered an absolutely amazing blog by a male Stampin' Up! demonstrator.  It is www.stampwithbrian.com .  Brian posts on a daily basis and gives detailed directions and hints.  On Sunday he made a  step-by-step tutorial called Triple Time Stamping.  I decided that it would make a lovely Fall card.  I got out my Color Coach and used Cherry Cobbler, Pumpkin Pie, and Night of Navy on Very Vanilla.  I think the Night of Navy is unexpected and makes it pop.  I won't repeat the steps involved- Brian does it in great detail.  I can say this is a fast and easy card.

Supplies:
Stamp Sets- French Foliage, Sincere Saluatations
Paper- Cherry Cobbler, Pumpkin Pie, Night of Navy, Very Vanilla
Ink- Cherry Cobbler, Pumpkin Pie, Night of Navy

Tuesday, September 11, 2012

Border Banter

This adorable Halloween wrapper was a swap I received at regionals.  It was made by Brenda Crawshaw from Framingham, MA.  I love this idea because I never think to make items other than cards, scrapbook pages, or home decor.  Isn't the use of twine wrapped around the mummy a great idea?

Supplies:
Stamps- Border Banter, Googly Ghouls
CS- Basic Black, Wisteria Wonder, Pumpkin Pie, WW
Ink- Stazon Black, Pumpkin Pie, Basic Gray
Accessories- Googlies, White Baker's Twine, Square Lattice Embossing Folder, Apothecary Accents Framelets

Sunday, September 9, 2012

Wonderfall II


This Fall card was made by Karen Leveille.  The background was stamped using the Woodgrain stamp.  Two different tricks I learned to make the 2 points on the banner are:


1.  Make a slit with your Paper Snips up the center of the banner.  Next snip from the corner into the top of the snip. Last, snip from the other corner to the center.


2.  Using a square punch, insert the banner to form a triangle.  Make sure the sides are equal.

Saturday, September 8, 2012

Vellum Envelope

I was asked where I got the Vellum Envelope from a previous post.  I made it as one of the Make 'n Takes at the providence Regional.  Here is a photo of where to score and cut.  Start with Vellum Card Stock cut to 7-1/4" x 7-1/4".  Using the Simply Scored Diagonal Plate, score at 3-7/8" on opposite corners.  Score at 2-7/8" on the other two opposing corners. Cut a triangular notch where the score lines intersect.  This makes it easier to crease on the fold lines.  I believe that directions were also included in the directions that came with the Simply Scored Diagonal Plate.  Hopes this helps!

Friday, September 7, 2012

Wonderfall

This lovely Fall card was another swap I received at the Providence Regional.  It was made by Susan DeAngelo.  The background is textured by using the Woodgrain Embossing Folder.

Wednesday, September 5, 2012

Delicate Designs Folders


I saw a decorative notepad on a display board at this year's Convention.  I thought it would make a nice "Welcome Back to School" gift for my para-educators at school.


I used Raspberry Ripple, Primrose Petals, and Pink Pirouette as one color combination; Cajun Craze, More Mustard, and Pumpkin Pie for another; and Midnight Muse, Gumball Green, and Bashful Blue for the last. 


I hope they like them!

Monday, September 3, 2012

Another Clockworks

Here is another Make 'N Take from Regionals.  There are 4 note cards with matching envelopes.  I like the vellum envelope tied with Baker's twine.

Wednesday, August 29, 2012

Clocksworks

Believe it or not this cute little box was made using 2 tags from the Two Tags Bigz Die.  I made it as one of the Make 'N Takes at the Providence Regional.  I love the flower.  First I stamped the Clockworks stamp on Calypso Coral card stock using the same color ink.  I punched two flowers using the Fancy Flower Punch.  The flower center was punched from the First Edition Specialty DSP, then scrunched.  I attached it using glue dots and then glued a Dahlia to the flower center.

Monday, August 27, 2012

Tips, Tips, and More Tips

The tips I learned at the Providence Regional were great.  There were several demonstrators from the east coast who made presentations.  They were wonderful.  I did not know you could stamp on cello bags.  The long thin bags look great stamped with black Stazon ink.  If you add a topper and some candy it would make a great Halloween treat.

I also did not know you can take ink directly from one of Stampin' Up!'s markers using a blender pen.  It gives a nice watercolor effect.  You should layer it on then use the marker directly on top of it.  Go back with the blender pen one last time and blend the color.

Deb Valder was one of the presenters.  I remember her name because she was fabulous.  She talked a mile a minute because she had so much to share and so little time.  Her first tip was to use dental floss between the layers of "Snailed" card stock if you placed them on crooked.  Place the dental floss between the layers and gently pull down.  Wow is that easy.  I usually take out my heat tool and heat up the back to loosen the adhesive.  Her way is easier!  Her other tips were to gently sand off stray ink with the sanding block.  I haven't tried that yet but you know I will.  And last but not least, use a parmesan cheese container to store your linen thread.  Place it in the jar and carefully find the beginning of the thread from the center and put it through one of the holes.  You know what I am buying on my next trip to WalMart?  Oh, her very last tip was if you are stamping away and it is lunchtime, you can use your heat tool to melt the cheese on your sandwich.  Instant panni sandwich!!
I am not going to try that!

Sunday, August 26, 2012

Providence Regional

Yesterday, my friend Joni and I attended Stampin' Up!'s Regional in Providence.  We drove down the night before without a hitch.  Joni treated me to a lovely dinner at a steak house.  We spent the night at the Westin.  It was pricey but very nice.  The beds were very comfy and the staff very pleasant.  We got up and had a quick bite to eat then used the walkway to the Convention Center.

There were about 450 attendees- 300 demonstrators and 100 guests.  We were treated to a day of great demonstrations, make and takes, and of course "free stuff".  At first I was disappointed because a stamp set was not listed as part of the registration fee.  I should not have doubted Stampin' Up! We received the Merry Moments Simply Scrappin' kit and at the very end everyone also got the stamp set Seasonal Sayings.
I liked this way better.   The make and takes' stamp set- Clocksworks, is not one I would purchase for myself. 

We sat with two ladies, Patti from Vermont and Roselyn from Las Vegas.  They were so sweet and added to the fun of the day.  Patti was kind enough to send this picture since my camera malfunctioned as we went to shoot a picture.

Thursday, August 23, 2012

Googly Ghouls and more

Stampin' Up!'s Regional for the northeast is this weekend in Providence.  Of course I have to go.  I decided to make a Halloween swap.  I CASED the background paper and made it using My Digital Studio.  I shrank it down in size...OK so my son did that part.  I was able to print it using my new HP printer.  I was pleasantly surprised it would take card stock.  I layered it on Basic Black, Pumpkin Pie, and Elegant Eggplant.  I stamped 2 bats and Frankenstein and mounted them on with dimensionals.

Tuesday, August 21, 2012

Christmas Lodge

I still love this stamp set that was first introduced last year.  I experimented with a card sketch from Splitcoast Stampers.  For the textured background I used the Square Lattice Textured Expressions Embossing Folder.  This card was simple and fast.  It came out all right but is not one of my favorites.  For DSP I used the plaid from the Festival of Prints DSP Stack- a real bargain for 48 sheets of 4-1/2" X 6-1/2".

Supplies:
Stamp- Christmas Lodge
Paper- WW, Cherry Cobbler, Festival of Prints DSP Stack
Ink- Cherry Cobbler
Accessories- retired ribbon in Cherry Cobbler

Sunday, August 19, 2012

Rejoicing with You

I wanted to use this stamp set for an upcoming class.  I made a beautiful card for a Convention swap but did not save any for myself.  I cannot remember what I did.  As hard as I tried nothing was coming out right.  Time to CASE.  This card I found on the Stampin' Up!'s website Stampin' Connection, a resource only for demonstrators.  It was done by Wendie Waldman from NM.  This was fast and easy to make.  It is hard to tell but I sprayed SmoochSPRITZ over the image for a little shimmer.
Supplies:
Stamp Set- Rejoicing with You
Paper- WW, Midnight Muse, Bashful Blue
Inks- Bashful Blue, Midnight Muse

Friday, August 17, 2012

Ornament Keepsakes

This ornament is on the cover of the Stampin' Up! Holiday Catalog.  The moment I saw it I had to make it!  When I first copy something, I make it as close as I can to the source.  After I have made one, I begin to experiment more and make it my own.  There are 3 layers.  The bottom and middle layers each consist of 20 stamped and cut out ornaments- thank goodness for the Framelit Ornament Dies.  They are glued together using a hot glue gun.  I did not use the new Silicone Craft Sheet (I did not have it yet), but wished I did.  I am sure my fingers would not have gotten toasty a couple of times!  Next time I make one, I will make the bottom layer first, add the linen thread loop, then add the Tulle Ribbon before placing layer two on top.

Wednesday, August 15, 2012

Ornament Keepsakes

I needed a card for an upcoming class and I just could not come up with anything I liked.  It was time to CASE!!! (Copy and Share Everything).  I found this card on Splitcoast Stampers by kathynruss.  It truly is a beautiful card and easy to make.  I changed the textured background to the new Fancy Fan Folder and voila!  a beautiful card.  You can find the original on http://www.splitcoaststampers.com/gallery/photo/2237752?&cat=23323 P.S. My customers loved it.