Thursday, September 27, 2012
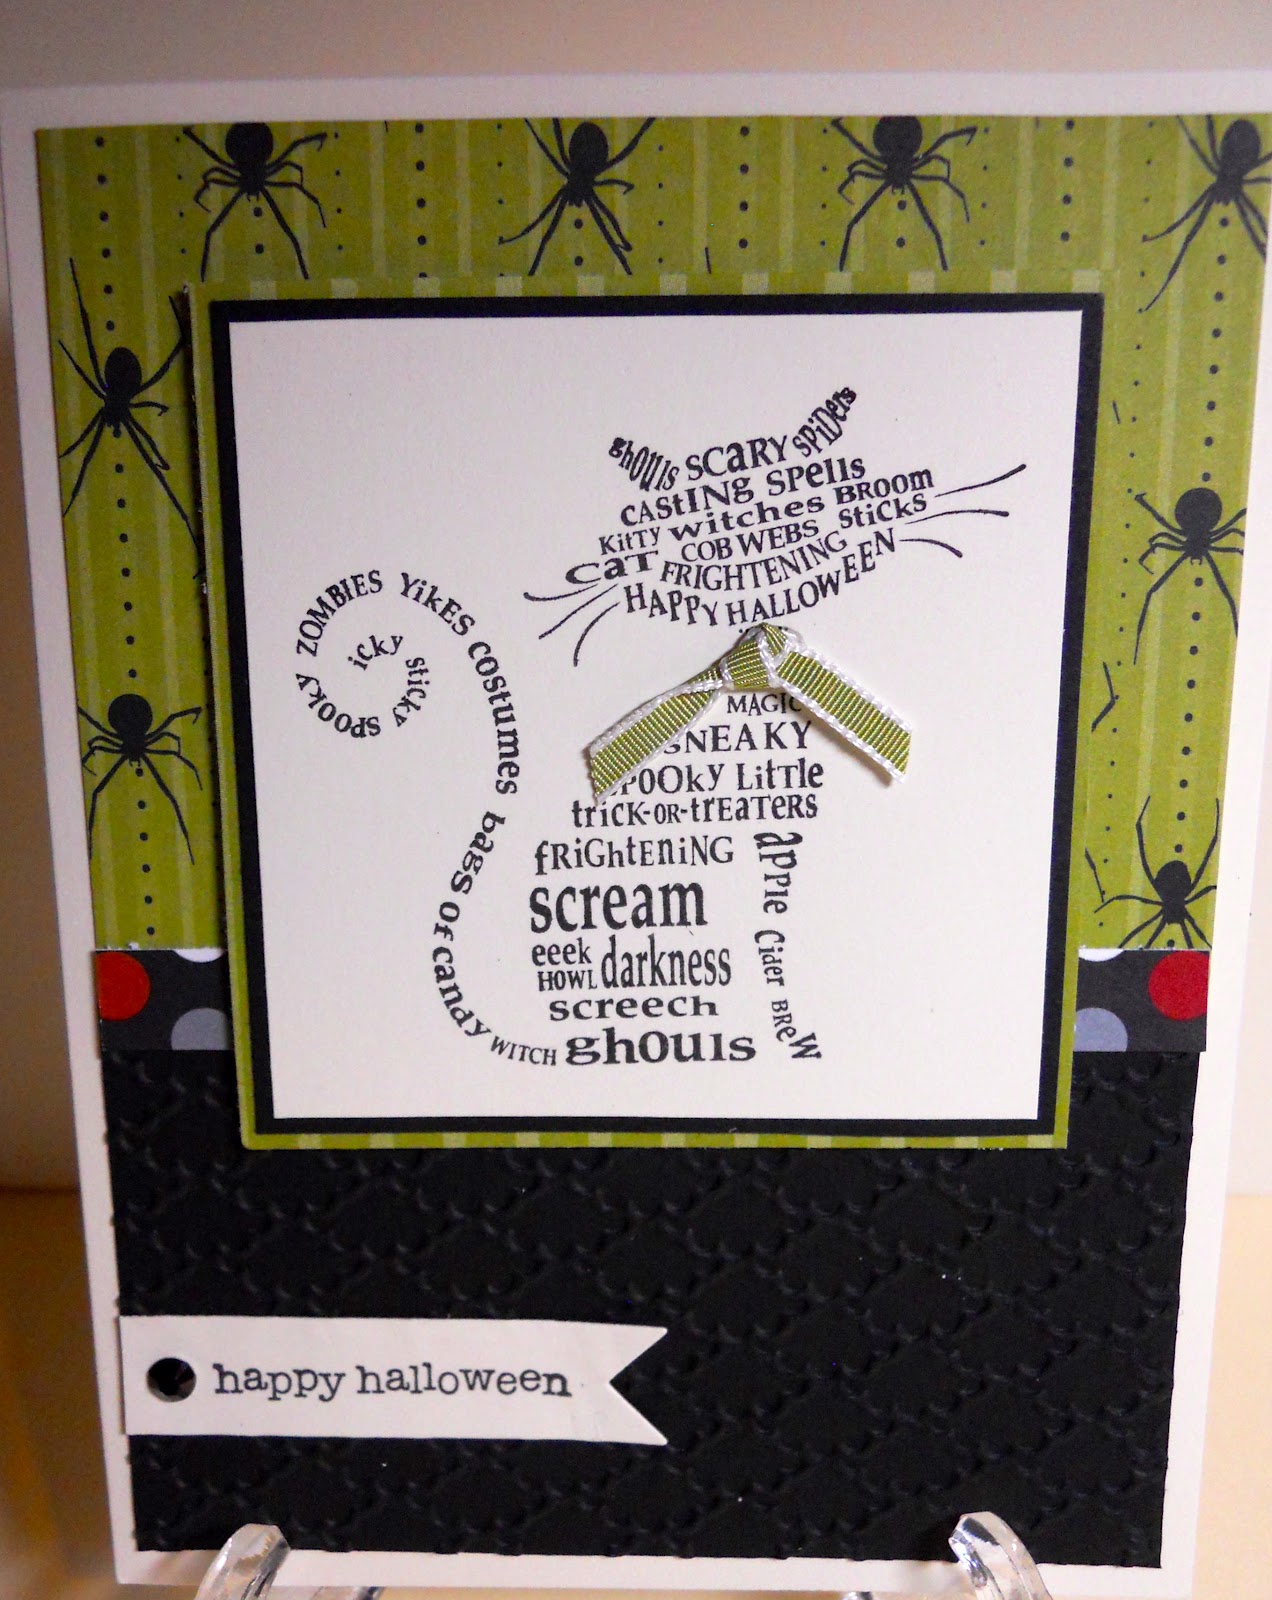
Frightening Feline

I received this adorable swap at Convention.  It was made by Lorree Bosworth of Ridgecrest, CA.  I believe the spider DSP has retired as I cannot find it in the current Catalog.  The black card stock at the bottom was embossed using the new Fancy Fan Folder.  How cute! 

Tuesday, September 25, 2012

Bootiful Occasions

This cute card I received as a swap from Sally Nusbaum at Convention.  She used Basic Grey card stock in the Spider Web embossing folder.  Next she put some White Shimmer paint in a mister filled with rubbing alcohol and sprayed liberally.    She colored in the boot, mounted it on Rich Razzleberry, and attached Striped Satin ribbon under a Pumpkin Pie circle with a brad.  I was not impressed with this stamp set until I saw Sally's card.  What a fun card!

Supplies:
Paper- Basic White, Basic Black, Basic Grey, Rich Razzleberry, Pumpkin Pie
Ink- Black Stazon, Pumpkin Pie, Rich Razzleberry, Old Olive
Accessories- Blender Pen, Spider Web embossing folder, White Shimmer Paint, Striped Satin Ribbon, Mini Brads

Sunday, September 23, 2012

Halloween

I found this card in my stash of holiday cards.  I know I CASED it from somewhere several years ago but sadly cannot give the person who created this credit.  This is a quick and easy card to make with very little stamping.

Friday, September 21, 2012

Home is Where the Haunts Is

Here is the first shadow box I made several years ago.  The dimensions are a standard card 4-1/4" by 5-1/2" and scored on both sides at 1/2" and 1".  I used a paintbrush and made a wash of several colors starting at the top of a 3-1/2" by 4-1/4" piece of watercolor paper.  Next I stamped the background using the wheel- Spooky Skyline.  I punched out a moon then added the witch using a Dimensional.  I stamped the house close to the 1" score line then carefully cut out an oval.  I stopped cutting the oval once I was close to the house and proceeded to cut around the house by hand.  I used SNAIL adhesive on the ends then used 3 black brads on each side as a decorative embellishment.

Wednesday, September 19, 2012

House of Haunts

Here is a card I made using the classic Halloween set- House of Haunts.  I made a shadow box then embossed the haunted house using black embossing powder on watercolor paper.  Next I made a mask for the moon and brayered shades of orange for the background.  I colored the moon in and attached it in the middle to the Pumpkin Pie cs.

Dimensions-  Two pieces of Pumpkin Pie card stock 5-1/2 " by 4-1/4".  I scored both at 1/2" and 1" on both ends.  On one piece I stamped "happy halloween" in the center towards the bottom then cut out a circle between the 2 scored lines being careful not to cut through "happy halloween".  Attach the 2 pieces of card stock between the end and the first scored line.  The watercolor paper is 3-1/2" by 4-1/4".

Monday, September 17, 2012

House of Haunts

I love Halloween.  I adore Halloween.  I love to decorate for Halloween.  My classroom has been described as the "room from Halloween h..."!  The kids love it, which is why I do it.  It is a shame my own kids are grown up and away for Halloween.

I wanted to make an easel card that I could use one of those little battery operated lights inside.  I stamped on vellum using the retired stamp set House of Haunts- you can bet I will never get rid of this set!  I cut my Basic Black card stock 8-1/2" by 4-1/4" and scored 4-1/4" down.  I cut a second piece 5-1/2" by 4-1/4" and scored 1/2" down from the top.  I cut out a rectangle from the smaller piece and inserted the vellum.  I used the 2Way Glue Pen on the inside to attach the vellum.  I cut out a piece of Howlstooth & Scaringbone DSP  4 " by 4-1/2" then cut out the center to frame the stamped image.  Next, using the Scallop Square die, I cut out the orange frame manipulating it to the size I wanted.  I again cut out the center and attached it on top of the DSP.  I used my new from the Providence Regional- Seasonal Sayings to stamp Happy Halloween, then layered it and attached to the bottom of the larger piece of black paper.

Saturday, September 15, 2012

Autumn Accents

Fall is my favorite time of year.  I love the cooler days, the crisp air, and the amazing colors when the trees begin to turn.  This was a technique that was demonstrated at the Stampin' Up! Regional in Providence.  Unfortunately I did not write down the name of the presenter.  For that I apologize.  Using the Natural Composition Specialty DSP, which is already embossed, I cut out leaves using the Autumn Accents Bigz Die.  Remember that you can cut out up to eight pieces of card stock at a time.  Next I started with my lightest color and buffed it into the paper using a sponge.  I added several colors ending with the darkest color on the outside edges.  Next I used the new Woodgrain Textured Impressions Embossing Folder on a piece of Crumb Cake.  Then I lightly sponged Soft Suede over the raised portions.  I put more on the knot holes.  Last, I layered the pieces together.  I can't stop using the retired stamp set Sincere Salutations.  It was a gift from Shelli, the co-founder of Stampin" Up! to all the demonstrators one year.  It is a very versatile set and I have not found anything yet that I like as well to replace it.

Supplies:
Stamp Set- Sincere Saluatations
Paper- More Mustard, Cherry Cobbler, Crumb Cake, Natural Composition Specialty DSP
Ink-  More Mustard, Cherry Cobbler, Garden Green, Pumpkin Pie, Daffodil Delight
Accessories- Decorative Label, Extra-Large Oval, Cherry Cobbler ribbon

Thursday, September 13, 2012

French Foliage

I have recently discovered an absolutely amazing blog by a male Stampin' Up! demonstrator.  It is www.stampwithbrian.com .  Brian posts on a daily basis and gives detailed directions and hints.  On Sunday he made a  step-by-step tutorial called Triple Time Stamping.  I decided that it would make a lovely Fall card.  I got out my Color Coach and used Cherry Cobbler, Pumpkin Pie, and Night of Navy on Very Vanilla.  I think the Night of Navy is unexpected and makes it pop.  I won't repeat the steps involved- Brian does it in great detail.  I can say this is a fast and easy card.

Supplies:
Stamp Sets- French Foliage, Sincere Saluatations
Paper- Cherry Cobbler, Pumpkin Pie, Night of Navy, Very Vanilla
Ink- Cherry Cobbler, Pumpkin Pie, Night of Navy

Tuesday, September 11, 2012

Border Banter

This adorable Halloween wrapper was a swap I received at regionals.  It was made by Brenda Crawshaw from Framingham, MA.  I love this idea because I never think to make items other than cards, scrapbook pages, or home decor.  Isn't the use of twine wrapped around the mummy a great idea?

Supplies:
Stamps- Border Banter, Googly Ghouls
CS- Basic Black, Wisteria Wonder, Pumpkin Pie, WW
Ink- Stazon Black, Pumpkin Pie, Basic Gray
Accessories- Googlies, White Baker's Twine, Square Lattice Embossing Folder, Apothecary Accents Framelets

Sunday, September 9, 2012

Wonderfall II


This Fall card was made by Karen Leveille.  The background was stamped using the Woodgrain stamp.  Two different tricks I learned to make the 2 points on the banner are:


1.  Make a slit with your Paper Snips up the center of the banner.  Next snip from the corner into the top of the snip. Last, snip from the other corner to the center.


2.  Using a square punch, insert the banner to form a triangle.  Make sure the sides are equal.

Saturday, September 8, 2012

Vellum Envelope

I was asked where I got the Vellum Envelope from a previous post.  I made it as one of the Make 'n Takes at the providence Regional.  Here is a photo of where to score and cut.  Start with Vellum Card Stock cut to 7-1/4" x 7-1/4".  Using the Simply Scored Diagonal Plate, score at 3-7/8" on opposite corners.  Score at 2-7/8" on the other two opposing corners. Cut a triangular notch where the score lines intersect.  This makes it easier to crease on the fold lines.  I believe that directions were also included in the directions that came with the Simply Scored Diagonal Plate.  Hopes this helps!

Friday, September 7, 2012

Wonderfall

This lovely Fall card was another swap I received at the Providence Regional.  It was made by Susan DeAngelo.  The background is textured by using the Woodgrain Embossing Folder.

Wednesday, September 5, 2012

Delicate Designs Folders


I saw a decorative notepad on a display board at this year's Convention.  I thought it would make a nice "Welcome Back to School" gift for my para-educators at school.


I used Raspberry Ripple, Primrose Petals, and Pink Pirouette as one color combination; Cajun Craze, More Mustard, and Pumpkin Pie for another; and Midnight Muse, Gumball Green, and Bashful Blue for the last. 


I hope they like them!

Monday, September 3, 2012

Another Clockworks

Here is another Make 'N Take from Regionals.  There are 4 note cards with matching envelopes.  I like the vellum envelope tied with Baker's twine.